Nothing can compare to a homemade gift. Love is woven into every stitch, stir, bead, or brush stroke. I really enjoy making and receiving homemade masterpieces and feel strongly that they are more meangingful than anything you can buy at the store.
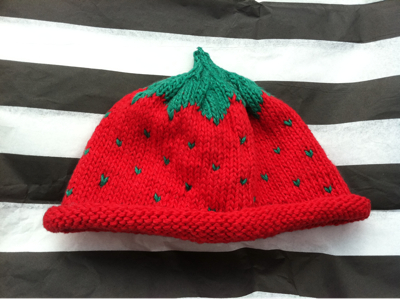
One of my closest friends is having a baby and a few weeks ago we celebrated “Squiggles” with a shower. Since this is a friend and baby I really care about I decided to make my famous strawberry hat. I have made this hat about 4 times now, but only for people I REALLY like because it takes quite a while. I also prefer to make it for crafty friends who will appreciate the time and effort I put into creating it.
I really enjoy doing crafts — especially knitting, beading, and sewing. I find it very calming to focus on an activity with my hands and immensely satisfying to actually create something myself. I’ve heard it’s good to try to do one creative thing each day. I don’t live up to that recommendation with my crafting, but I do always enjoy tapping into my creative side while working on a project. There is something very meditative about focusing on the details of each stitch, counting each row, and getting lost in the project.
Anyone looking to try a new project (who also has a dear friend who appreciates homemade gifts) should consider giving this hat a try. It’s absolutely adorable and really fun to imagine the new baby while you’re working on it.

This pattern is not for beginning knitters, but it’s really not very complicated. I have adapted it from an Ann Norling pattern.
Knit on four bamboo double-tipped needles size number 3 (0.25mm) – slightly larger gauge needles also work, but small delicate stitching seem particularly well suited for this cute little baby hat.
100% mercerized cotton in bright red and bright green.
Cast on 88 red stitches
Rows 1 – 22 – knit red. The edges will begin to curl up — feel free to help shape this curl.
Row 23 – knit seven stitches in red and one stitch in green. Repeat 7/1 pattern until the end of row.
Rows 24 – 26 – knit solid red.
Row 27 – knit four red stitches and one green stitch followed by seven red stitches and one green stitch. Repeat 7/1 pattern until the end of the row.
The green stitches should be directly between the previous green stitches. This creates the small green “flecks” in the strawberry. Repeat this twice so there are four rows with green stitches.
Follow with four rows of solid red stitches.

You will now begin the leaves at the top of the hat! This part gets a little complicated, so bear with me.
Row 1 – knit four red, one green, seven red, one green, repeat 7/1 pattern
Row 2 – knit three red, three green, five red, three green, repeat 5/3 pattern
Row 3 – knit two red, five green, three red, five green, repeat 3/5 pattern
Row 4 – knit one red, seven green, repeat 1/7 pattern
Row 5 – knit all green
Row 6 – knit all green. Knit six stitches and then knit two stitches together (this begins to decrease the top of the hat)
Row 7 – knit all green. Knit five stitches and then knit two stitches together
Row 8 – knit all green. Knit four stitches and then knit two together.
Repeat decreasing pattern until you have one stitch remaining from each leaf. I usually decrease from four needles to three at this point to make things a bit easier.
Knit final stitches together for six rows and then knit together until one stitch remains. Cut thread and pull it through the last stitch and pull tight to create a knot. Using a crochet hook loop the thread inside the “stem” and weave into stitches on the inside of the hat.
Voila! You have the cutest little baby hat imaginable.

Leave a Reply